-
How to paint Starry Night
A Swedish 10th grade student reached out to us with his question: How do you paint Starry Night? We would like to share his questions and our answers with you.
Q: What would you say is the most significant part of Starry Night? The part which you would advise me to focus on perfecting during the painting process?
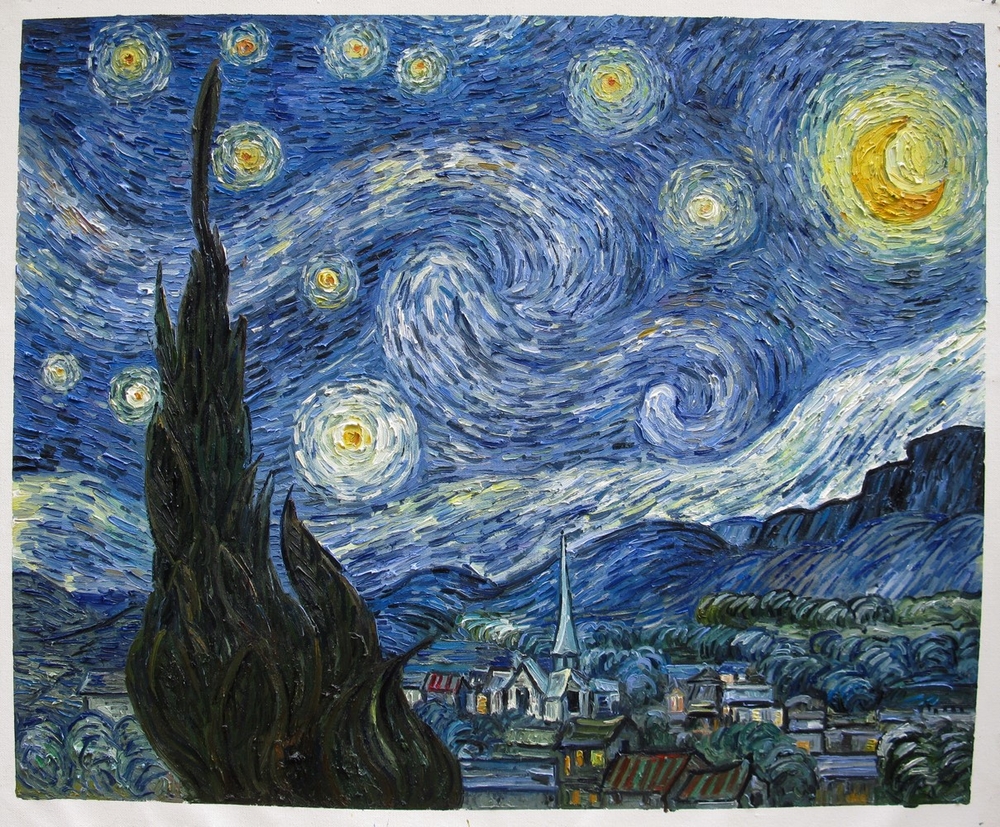
A: The swirly sky is the most typical part of the painting. This part needs to be done right if you want to achieve a high quality replica.
Q: What techniques were used in the creation of the Starry Night? (impasto technique etc)
A: The typical Van Gogh style brushstrokes are created at the end of the process using impasto technique. The brushstrokes need to be done with a certain pace. Van Gogh was able to paint the amazing number of 1 painting a day. Keep that in mind when you paint in Van Gogh style.
Q: What did you find was the most difficult part to paint while working on the Starry Night replica?
A: The sky is the most difficult part to paint. We are lucky to be able paint the base layers of the painting slowly. But finishing the painting happens at relatively high speed which requires a lot of practice.
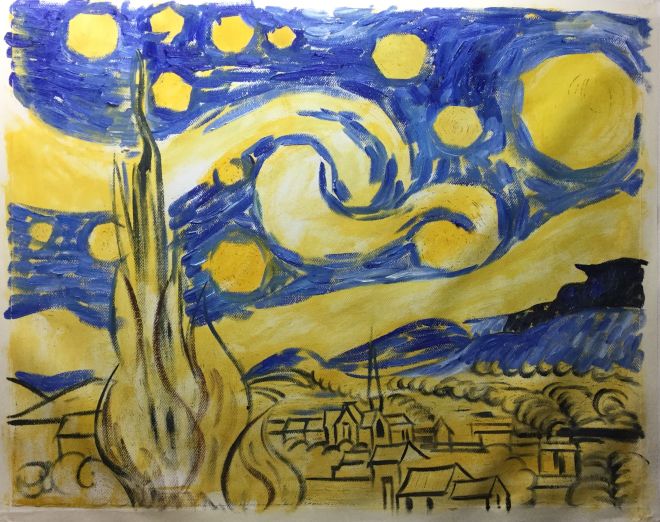
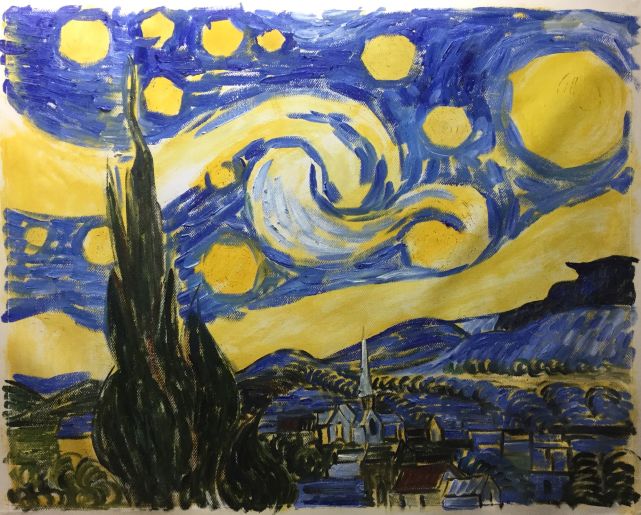
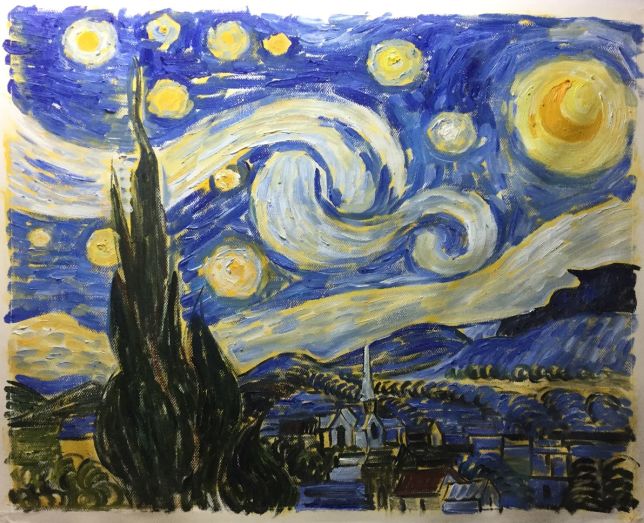
Q: In what order did you paint all the different parts of the painting?
A: This can best be explained by the attached photos of the process of painting the Starry Night (scroll down on mobile).
Q: My painting is done on a large scale (120cmx150cm canvas), what advice would you give me to ensure that my painting ends up looking as accurate as possible?
A: The original Starry Night is 73 x 92 cm. 120 x 150 cm are more or less the same proportions so that’s a good start. To create a similar effect as the original size you should use a larger brush. Every brushstroke must be longer, wider, thicker.. And at the same time arm length perspective on the painting will differ with a larger canvas. This makes it harder to see if you are proceeding well. Make sure to keep track of your progress by stepping back further quite regularly.
Q: In the case that I end up having much less time to finish the painting than what I had planned, what would you advise me to do then? What parts should I focus on to ensure that I get a decent looking result?
A: I would suggest to paint a smaller size Starry Night, but there won’t be time for that either I suppose :). As mentioned before, the sky is the most important part, but without the tree, the moon and the church it would not look like a proper Starry Night, so don’t forget to spend time on these under time pressure.
Q: How long did it take you to complete the painting?
A: We wish we could paint as fast as Van Gogh, but there can only be one Vincent.. Starry Night takes us usually 3-4 weeks, but as this is our bestseller we usually paint a few at the same time.
You may also like this blog: Did Van Gogh start painting Starry Night with the cypress tree or with the background?
Find out in your FREE Van Gogh e-book.
Hundreds of questions answered by Van Gogh himself!
Q: What would you say is the most significant part of Starry Night? The part which you would advise me to focus on perfecting during the painting process?
A: The swirly sky is the most typical part of the painting. This part needs to be done right if you want to achieve a high quality replica.
Q: What techniques were used in the creation of the Starry Night? (impasto technique etc)
A: The typical Van Gogh style brushstrokes are created at the end of the process using impasto technique. The brushstrokes need to be done with a certain pace. Van Gogh was able to paint the amazing number of 1 painting a day. Keep that in mind when you paint in Van Gogh style.
Q: What did you find was the most difficult part to paint while working on the Starry Night replica?
A: The sky is the most difficult part to paint. We are lucky to be able paint the base layers of the painting slowly. But finishing the painting happens at relatively high speed which requires a lot of practice.
Q: In what order did you paint all the different parts of the painting?
A: This can best be explained by the attached photos of the process of painting the Starry Night (scroll down on mobile).
Q: My painting is done on a large scale (120cmx150cm canvas), what advice would you give me to ensure that my painting ends up looking as accurate as possible?
A: The original Starry Night is 73 x 92 cm. 120 x 150 cm are more or less the same proportions so that’s a good start. To create a similar effect as the original size you should use a larger brush. Every brushstroke must be longer, wider, thicker.. And at the same time arm length perspective on the painting will differ with a larger canvas. This makes it harder to see if you are proceeding well. Make sure to keep track of your progress by stepping back further quite regularly.
Q: In the case that I end up having much less time to finish the painting than what I had planned, what would you advise me to do then? What parts should I focus on to ensure that I get a decent looking result?
A: I would suggest to paint a smaller size Starry Night, but there won’t be time for that either I suppose :). As mentioned before, the sky is the most important part, but without the tree, the moon and the church it would not look like a proper Starry Night, so don’t forget to spend time on these under time pressure.
Q: How long did it take you to complete the painting?
A: We wish we could paint as fast as Van Gogh, but there can only be one Vincent.. Starry Night takes us usually 3-4 weeks, but as this is our bestseller we usually paint a few at the same time.
Order a Starry Night replica.
Instead of painting it yourself you may want to order the reproduction. Hand-painted in oil on canvas by our talented artists.You may also like this blog: Did Van Gogh start painting Starry Night with the cypress tree or with the background?
Your Daily Dose of Van Gogh
What did Vincent van Gogh write on this day?Find out in your FREE Van Gogh e-book.
Hundreds of questions answered by Van Gogh himself!
Comments (0)
No comments found.
